Monday, 25 January 2016

Lemon Curd Tart


A very simple tart yet loaded with heaps of flavor. The sharp tartness of the lemons is contrast with the creaminess of the whipped topping. The topping, in fact, compliments the sharpness of the lemons. The bright yellowy-ness of the curd really does elevate my mood even in the bleakest of days. This dessert is wonderfully light yet lusciously creamy, flawlessly balanced with the freshness of the lemons – a perfect ending to a sumptuous meal in the summer or the most wonderful accompaniment to a cup of tea in the winter.

This is a cheat’s version of a lemon meringue pie. Tinkering with the original recipe, I have found a way to make it faster and easier. The base would be a simple biscuit base however; there is no cheating or any shortcut to making a good lemon curd. You could, of course, buy jars of lemon curd and use it instead of the fresh one. But do keep in mind; the taste is going to be altered.

I like my tart neither on the “too sweet” or “too sour” side. However, you are absolutely free to adjust the sugar or the lemon juice accordingly.

The tart tin should be 10 inches in diameter.

For the base:
200 grams digestives
100 grams melted butter

Chuck in the digestives in the food processor and whizz it. Add the melted and cooled butter into the mixture. Whizz it again to combine. Once combined, it should look malleable and somehow it does mimic “wet sand”.

Put the mixture into the tart tin and press on to the sides properly. The mixture should be spread and pressed well. Rest it in the fridge for it to set.

For the Lemon Curd:
1 cup castor sugar
150 grams butter (softened)
7 egg yolks
1 whole egg
1 tsp cornflour
1 tsp lemon zest
2/3rd cup lemon juice

Beat the butter, the sugar and salt until combined. Add the egg, the egg yolks and the zest and whisk until creamy. Mix the cornflour with a teaspoon of water and pour it into the egg mixture. Now add the lemon juice. Do not panic if you see the mixture splitting. It is supposed to split, just be patient, it will all come together when it is heated in a pan.

Pour the mixture in a pan and gently heat it. Make sure it’s on the lowest heat, stir continuously. After stirring for about 10 minutes, you will notice that the mixture thickens and it should coat the back of a spoon. By this time, the mixture should look very smooth. There should be no lumps. In case, if you happen to find lumps in the mixture, do not panic. Just sieve the mixture and it should work out fine.

Cover the mixture with cling film and refrigerate for at least 3 hours before using it in the tart.

For the topping:
1 cup whipping cream
2-3 tbsp icing sugar

Whip the cream until stiff peaks form. Refrigerate at least an hour before using.

For the assembly:

Spoon the lemon curd into the tart base and spread it. Completely flatten the top so that it’s easy for the tart to hold the whipped cream in it. Put the whipped cream on it. Let it sit in the fridge for at least an hour before serving.

Lastly, I am a terrible photographer. The image does look a little lopsided but I promise the taste is not compromised..! ;-)


Wednesday, 6 January 2016

Coconut Tart

Starting with "A very Happy New Year to Everyone" - this is my first recipe in this year and I thought I should start with something the I absolutely love and adore. Since my childhood, the attraction to Coconut was immensely enormous. I loved coconut in any form – sweet or savory and as long as there was coconut, I was happy and serene. I could not conclude which form of coconut I loved more -the sweet or the savory. Irrespective of its form, fresh coconut itself has its own flavor and aroma. I simply loved chewing the fresh flesh of the coconut. The mellow sweetness and sugariness of the flesh could be used in curries to give it that extra edge and depth and also could be used to make it into gorgeously delectable desserts.

I believe this tart does justice to Coconut as it is not mixed or adulterated with anything else, thereby giving it the fresh sweet coconuty taste.

The inspiration for this came from eating at a Thai Restaurant that served custard that was made with coconut milk, eggs and palm sugar. However, I modified the recipe by adding gelatin to set it and made it into a tart form making the whole process a whole lot easier.

For the Tart::

1 can coconut cream (80ml)
4-5 tbsp palm sugar/regular jaggery
150grams sweetened coconut cookies
75grams butter (softened)
2-3 tbsp desiccated coconut
1 tbsp gelatin (heaped)
A loose base tart tin

Before proceeding to the tart, I would like to mention a few things about the tart. I used regular jaggery, the jaggery that is readily available in stores across in India. However, you can substitute it with palm sugar thereby deepening the flavor and the sweetness in the tart. Also, I added about 4-5 tablespoons of “liquid” jaggery – since jaggery comes with a lot of impurities, it is essential that it is liquefied by adding a little water, heating until the jaggery melts and straining it through cheesecloth. You can always choose to tinker with the sweetness a little by adding more jaggery or palm sugar to the tart.

I used a can of coconut cream as the cream has its own intense sweetness adding depths of flavor to the tart. However if you wish to make it a little lighter and less creamy in texture, I suggest using coconut milk. So that would be half a can of coconut milk and half of the coconut cream.
I don’t think this dessert needed any adornments and trimmings as I believe that presenting a slice simply would be enough to mesmerize the eater of this wonderfully gorgeous and mellowy golden dessert. If you wish to beautify it further, please toast some fresh coconut shavings and strew it across greedily! J

I know I am being terribly shameless ;) by using a can of coconut cream but you can always use fresh coconut milk and coconut cream for this recipe but using the can makes it a whole lot easy and less time consuming.

Blooming the Gelatin::

The most important step is to bloom the gelatin. Add the tablespoon of gelatin to ¼ cup of cold water and just keep it aside for few minutes. As soon as the gelatin is swollen and fat, add ¼ cup of hot water, stir vigorously until it is all melted in the heat of the boiling water and looks completely transparent. Set aside.

For the Base::

Use a food processor, throw in the biscuits and the softened butter. Whizz it until it resembles wet sand. Then put the mixture into the tart pan and press it with the back of a spoon coating every inch of the pan. Put the pan into the fridge so that the mixture hardens.

For the Cream Mixture::

Mix the palm sugar and the coconut cream until fully combined. The color should change from white-ish creamy to mellow gold/brown. Heat the mixture a little and add the liquid gelatin. Remove from heat and keep aside until it cools down a little.

Once it is of bearable temperature, fill the tart pan completely with this creamy mixture until the brink and put it back into the fridge. As the mixture cools down in the refrigerator, it will start to set.

Cut into pieces and serve cold :)


Sunday, 15 March 2015

Red Velvet Cake


Elegance and grace are the names that I would like to use as synonyms for this cake. Its sheer beauty is strikingly enough for the crowd to woo your baking skills.

However, it doesn't really need that much for care to bake this. All you need is a little bit of patience and of course the most important ingredient of all – Love

You can bake this for anniversaries, birthdays and even Valentine’s Day.

Few things to remember: I used something that I would like to call a “Mock Cream Cheese”. 

However please feel absolutely free to use cream cheese frosting instead of my mock cream cheese. 
Living in a place of limited supply, I do need to make adjustments, thereby trying to replicate.

If you are not fond of cream cheese, it’s perfectly okay to just use butter cream. Again, I used an egg less version for the sponge, you can always opt for the regular sponge.

For the butter cream I land up using the same amounts of butter to confectioner’s sugar, however, if you wish you can always use more but I do not recommend using less.

For the cake:
1 cup flour
2tbsp cocoa powder
1 tsp baking powder
½ tsp baking soda
Pinch of salt
1 cup plain bottled soda water
100 gms softened butter
1 can sweetened condensed milk
¼ cup red food color

Sift the baking powder, soda, flour, cocoa powder and salt and set aside.

In a mixing bowl, beat the butter until it’s light, fluffy and pale. Add the condensed milk and combine. Alternately, starting with the dry ingredients, add the flour mixture and the cup of soda. Sometimes you might need a little extra soda; the batter should be dropping consistency.  Mix the color once all the ingredients are properly combined.

Bake this in a round loose bottomed 8 inch cake tin for about 45-50 minutes. Do check the doneness after 45 minutes. Depending on the oven, the time may vary.

Once done, let it cool for about 15 minutes before cutting the cake in three equal portions for the icing. Let it cool completely.

For the filling:
100grams butter
100 grams icing sugar
¼ cup melted cheese

Beat the softened butter and the sifted icing sugar until its extremely pale, thick and fluffy. It should take about a good 10-15 minutes to achieve this.

For the caramel:
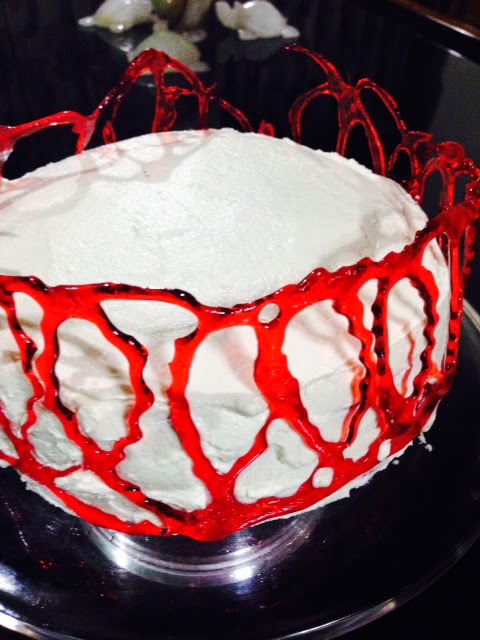
I find it particularly difficult to explain how to make any decorations using caramel. I used a cup of castor sugar with a tad bit of water. Once it started becoming amber, I added red food color to it.
I made the rings on a silicone baking sheet and while it was still a little soft, I peeled it off and molded it around the cake.

It doesn’t really add much to the flavor of the cake but it definitely gives it sheer chic elegance!

Assembly:

Spread a layer of cheese butter cream on the cake slice. Sandwich it with the next layer repeating the same. Top it with the last layer of cake and spread the icing evenly on the whole cake, covering nooks and crannies. Once evenly covered with butter cream, mold the caramel rings onto it. Set it in the fridge for few minutes in case the butter cream becomes too soft. 


Sunday, 8 March 2015

Honey Praline Cake


No matter what I try to do with my spare time, my heart always gives in completely to baking more than anything else. I used this cake as an excuse to celebrate a dear one’s birthday. However, on an honest note, I was keener on the cake more than the actual birthday.

I made this using my egg-less cake recipe but you can alter it and use the normal sponge cake recipe. Just add the honey to the usual sponge cake recipe.

I used cashews while making the praline; you can always almonds or peanuts in the recipe.

For the cake:
1 cup flour
1 tsp baking powder
½ tsp baking soda
Pinch of salt
1 cup plain bottled soda water
100 gms softened butter
1 can sweetened condensed milk
50 gms honey

Sift the baking powder, soda, flour and salt and set aside.

In a mixing bowl, beat the butter until it’s light, fluffy and pale. Add the condensed milk and combine. Alternately, starting with the dry ingredients, add the flour mixture and the cup of soda. Sometimes you might need a little extra soda, the batter should be dropping consistency.  Mix the honey once all the ingredients are properly combined.

Bake this in a round loose bottomed 8 inch cake tin for about 45-50 minutes. Do check the doneness after 45 minutes. Depending the oven, the time may vary.

Once done, let it cool for about 15 minutes before cutting the cake in three equal portions for the icing. Let it cool completely.

For the Icing:
100 gms softened butter
50 grams honey
100 gms sifted icing sugar
2-4 tbsp milk

Beat the butter, honey and the sifted icing sugar until fluffy and very pale. The color should be whitish yellowy. Set aside.

For the praline:
100 gms castor sugar
¼ th cup water

Handful of Toasted cashews or any nut of your choice

Add the sugar and water to a pan and mix until it’s completely combined. Put it on the high flame and wait until the mixture starts bubbling. Let it bubble away vigorously until the color turns deep amber yellow. Toss in the nuts and pour the mixture on a silicone mat. Let it set completely before you try to peel it off.

Once cooled, beat the praline disc with a rolling pin until you have manageable shards. Using a food processor, make it almost to a powder. Here I say almost and not powder because I want it to have few pieces here and there to give it a texture. However you will notice that once you grind it in a food processor, there will be a powdery dust on the bottom. We need that dust as we are going to fill it in between the layers.

Assembly:

Spread a layer of butter cream on the cake slice and sprinkle it with the fine praline dust. Sandwich it with the next layer repeating the same. Top it with the last layer of cake and spread the icing evenly on the whole cake, covering nooks and crannies. Once evenly covered with butter cream, sprinkle the cake generously (on all sides) with the rough and uneven bits and pieces of the praline dust. Set it in the fridge for few minutes in case the butter cream becomes too soft. 


This strikingly elegant, almost artistic cake z ready to eat :)


Thursday, 19 February 2015

Colorblast Oats


What an incredibly suitable name for the most scrumptious and refreshingly healthy oats. Oats are considered a super food but having it regularly the “regular” way makes it more like an unpleasant task rather than something that you enjoy. For people who feel the same way like me, there is colorblast oats - Super easy, super healthy and delectably mouth watering. It looks so vibrant that it almost makes me feel warm from inside. This is definitely a feel good recipe.

Few things to note: you can always adjust the amount of heat. Just don’t include the green chilies if you don’t like your food spicy. Also, you can use frozen veggies but do include fresh bell peppers. Trust me, addition of the peppers make the oats delightful.

This does look like an extensive ingredient list but everything is thrown in together into the pot and if you are using frozen veggies, your work is reduced by more than half.

I do emphasize the importance of adding the fresh coriander at the end – there is a subtlety that comes only after adding this fragrant green.

Everything that is being used in this is extremely healthy for you. And for people who wants to be a little unhealthy can add a tbsp of butter to increase the richness making it more velvet like ! ;-)

I have been using this as a breakfast as well as dinner so yes you can eat this anytime for any meal. 

For the recipe:

½ cup instant oats
1 large carrot diced
2 medium potatoes diced
1 red bell pepper diced
1 yellow bell pepper diced
1 cup broccoli florets
½ cup green peas
2 onions chopped
½ tsp minced garlic
2 chopped green chilies
3 ripe tomatoes chopped
1/4th cup tomato puree
2 tbsp mild olive oil
1 tsp mustard seeds
½ tsp turmeric powder
1 tsp cumin powder
1-1.5 cups of chicken/veggie stock
½ cup fresh coriander chopped
Salt to taste

Heat a big pot with oil. Pop the mustard seeds in it. By popping I mean, just throw them into the oil and cover, they will spit and splatter around in the pan releasing its entire flavor. Then add the onions, garlic and green chilies, sauté until they are lightly browned.

Chuck in all the veggies except broccoli and tomato. Sprinkle the turmeric and stir them suitably to coat them in the oil, season and add about half a cup of the stock. Cover and let it come to a boil.
The potatoes should be cooked in about 5 minutes. Once they are done add the tomatoes and the puree. On high heat, stir the contents and add the oats. Toss for sometime before adding the rest of the stock. Cover and cook until the oats are done.

Toss in the broccoli and switch off the heat before adding the chopped coriander.  

It looks quite gloopy in the beginning but as soon as you take it off the heat, it should have a beautifully smooth consistency.


Serve warm! Happy cooking folks .. ! 


Sunday, 15 February 2015

Chicken in Coriander Sauce

I always feel a little biased towards coriander, it being my favorite among greens. In Indian cuisine, fresh Coriander is mostly used as a garnish but to me it’s much more than just a garnishing element on the main dish. That is where the inspiration for this dish came from.

I considered a lot of variations to this dish but ultimately, I preferred this one as it highlighted the main ingredient; Coriander. I do add a squeeze of lemon as it brings out the flavor mouthwatering flavor of coriander.

Incredibly easy to make, it’s prepared in less than 15-20 minutes and can be served with rice or any kind of bread.

For the Recipe:

1 cup chicken thighs (cut into small pieces)
2 cups of fresh coriander
½ tsp garlic and ginger paste
½ a lemon 
1-2 green chilies
1 tsp garam Masala
1 tsp turmeric
2 tbsp mild olive oil
Salt to taste

Put the coriander, chilies, ginger and garlic paste in a blender and blend until absolutely smooth and silky. Sprinkle some salt and squeeze the lemon in the sauce. Set aside.

In a pan, heat the oil and sauté the chicken with turmeric in it. Sauté on a high heat so that we can give some color to the pieces. Once they turn mellow ocher, add the paste. Mix all the ingredients in the pan, sprinkle the garam masala. Reduce the heat and cover to cook the chicken. In about 7-10 minutes, the chicken will be completely cooked. Increase the heat and stir the contents until the oil separates. Check for the seasoning and the incredibly easy and scrumptiously delightful creation is ready to eat.


Serve hot with steamed rice or any bread of your choice. J


Monday, 26 January 2015

Velvet Soup

I call it my velvet soup because even without the addition of any cream or butter, the soup tends to be very smooth and velvety. Inspiration for this soup came from a basic tomato soup; however I chose not to add any garlic to it. Garlic is one of my favorite additions to any dish that I prepare but for this one I chose to leave it out.

This soup seems to be child’s play. On a beautiful cold wintery evening, a bowl of velvet soup is all I want. You can, of course, add croutons to it or you can simply have it the way it is.

The addition of the carrot is very important as it releases its sweetness to the soup. Also, I fry the carrots in the oil prior to sautéing the tomatoes. It just gives a crispy edge against the velvety silkiness of the soup.

I find it absolutely necessary to flavor the soup with green chilies. However, if you wish, you can leave it out. The green chilies can be used in less or more quantity. I like my food quite hot thereby I added 4 green chilies chopped. The intense warmth in this soup is brought in by the chilies.

I used water to change the consistency of the soup giving it a clean sumptuous taste. However you can use vegetable or chicken stock. Addition of the stock will alter the simplicity of the soup, making the flavor denser. Also, it does add a depth to the soup.

This is one of the most effortless soups. Not only it can be consumed for dinner, I love to sip this in the morning as my breakfast too!

For the Soup:

8-10 Tomatoes chopped
2 tbsp Mild olive oil
1 large carrot chopped finely
1 tbsp + 1 tbsp dried oregano
2- 4 green chilies chopped
1 cup vegetable stock
Salt
Pepper
A pinch of sugar
Sprinkle of fresh coriander (optional)
A small amount of butter (optional)

In a large deep pan, heat the oil and add the carrots. Sprinkle a little salt and about half tablespoon oregano. Fry until its crisp, take it out and leave it aside.

Throw in the tomatoes and chopped chilies and stir on a high heat. Add salt, pepper and remaining half tbsp of oregano. Cover and leave it on high heat until the tomatoes starts to almost melt down. 

Take it off the heat and blitz it to a smooth paste. Strain the paste; you will see that the tomato seeds and skin, chili seeds and skin and the oregano are left behind.

Transfer the contents to the same pot. Stir in the vegetable stock to change the viscosity. Adjust the seasoning and toss in the carrots at this stage and add the remaining oregano. Let it come to a rolling boil.

Serve hot with a tiny cube of butter and a sprinkle of fresh coriander. You can devour this with or 
without croutons!!